

3.0.3: Replying to a message
Click on the ‘Post Reply’ button. You will be shown the Posting Form message editor. Despite its complex appearance, it is very simple to use.
3.0.4: Using the Posting Form
Enter the Subject of your reply, then enter the message body below. To send the message click Submit.
Click on the ‘Post Reply’ button. You will be shown the Posting Form message editor. Despite its complex appearance, it is very simple to use.
3.0.4: Using the Posting Form
Enter the Subject of your reply, then enter the message body below. To send the message click Submit.

If you wish to preview your message before posting, click on Preview. If you are not happy with the message, the Posting Form is still on your screen immediately below the preview, where you can continue editing.
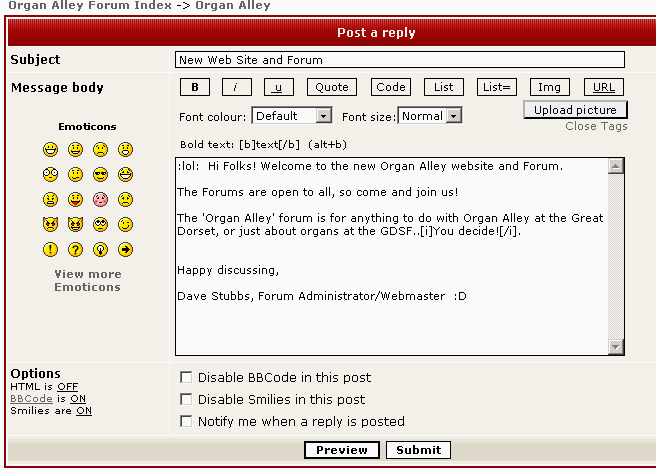
3.0.5: Detailed use of the Posting Form
You can add extra features to your message using a special formatting called BBCode. See 1.2.5 BBCode.
Don’t worry about the technical stuff, you can just use the basic functions if you wish.
At the top of the Editor, there are a set of controls to change the appearance of the text. The three most commonly used are Bold, Italics and Underline:
Section 3.0: Visual Guide to Using the ‘ Bulletin Board’
When you enter the ‘board’ from the Organ Alley web site, you will be presented with a list of Forums.
Note that some Forums may be hidden until you have logged in (see 1.1.2 Logging In).
When you enter the ‘board’ from the Organ Alley web site, you will be presented with a list of Forums.
Note that some Forums may be hidden until you have logged in (see 1.1.2 Logging In).
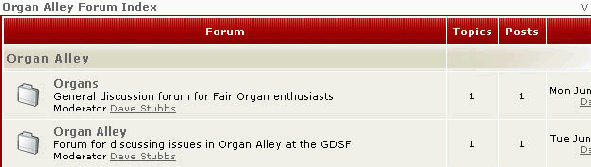
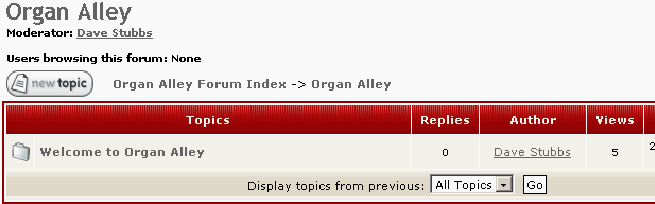
3.0.1: Entering a Forum
Click on a link as shown below to enter a Forum.
Click on a link as shown below to enter a Forum.
Link to Organs
Forum
Forum
Link to Organ Alley Forum


Visual Guide

If you click on these buttons, a special command is inserted at the cursor position. For example, if you click on the BOLD button, a command to display all following text in bold will be inserted “[b]”. If you now type the part of your message that you wish to be shown in bold and then click the BOLD button again, an ‘End of Bold’ command will be inserted “[/b]”, so that all text that follows will be displayed normally again.
You will see: [b]Your message in bold[/b]. For Italics: [i]Your message in italics[/i] and for underline:
[u]Your message underlined[/u].
The messages above would appear as:
Your message in bold Your message in italics Your message underlined
Note that you will not see the effect until you either Preview or Submit your message:
The button automatically changes to an ‘End of’ code after you click it, shown by a ‘*’ in the button. If you click it again, it will change back to the opening code. It is possible to be out of step with the button’s state, so you must keep track of it yourself. See 1.2.5 BBCode for more details of using the rest of these features.
If you wish to insert a ‘Smilie’ (see 1.2.6 Smilies), click on the required smilie icon on the left side of the Posting Form.. This will insert a small text sequence at the current cursor position, representing the selected Smilie. For example, ‘Very Happy’ Smilie is inserted as “ : D ”, ‘Surprised’ is “ :o ”.

Note that you will not see the Smilie until you either Preview or Submit your message.
3.0.6: Starting a new topic
If you wish to begin a new Topic (see section 1.0 for a definition) , first ensure that you are in the required Forum (see 3.0.1 Entering a Forum).
Click on New Topic.
This will open the Posting Form, the operation of which is identical to 3.0.4 Using The Posting Form, except that the title shows ‘Post a new topic’.
After you have entered your message, you can Preview/Re-edit or you can Submit the message to the selected Forum, where it will be seen by other users.
3.0.6: Starting a new topic
If you wish to begin a new Topic (see section 1.0 for a definition) , first ensure that you are in the required Forum (see 3.0.1 Entering a Forum).
Click on New Topic.
This will open the Posting Form, the operation of which is identical to 3.0.4 Using The Posting Form, except that the title shows ‘Post a new topic’.
After you have entered your message, you can Preview/Re-
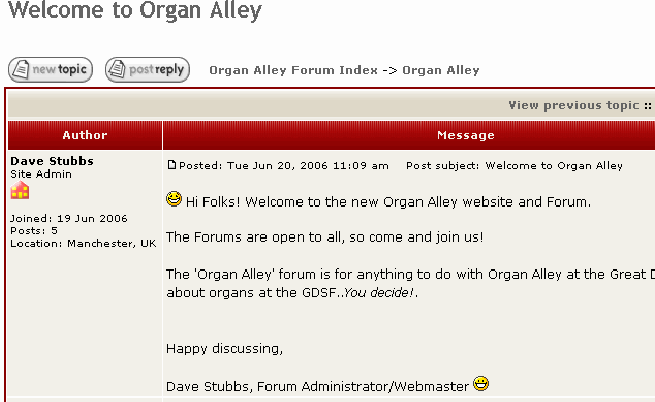
This shows you where you are in the Bulletin Board.
Once you have entered, you will be presented with the Forum’s own window:

Click on Register:
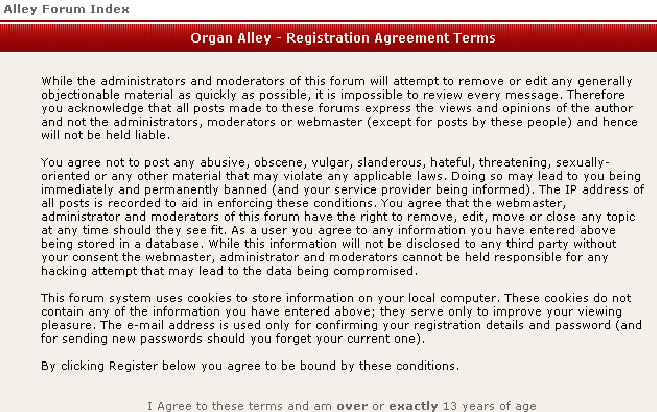
You will be shown the Registration Agreement Terms:
You will be shown the Registration Agreement Terms:

Despite the form’s complex appearance, there are only five entries which must be completed (shown above).
These are indicated with an asterisk “*”;
Username: It is preferred that you use your real name, as this tells other users who they are talking to.
E-mail address : You must enter a valid email address here, because the system will send you an activation link via email, which you must click to activate your account (see 4.0.2 Activating your account). Also, it will be the address that other users send you private emails (if you enable the option in the registration form).
If you enter your address incorrectly, you will not receive any indication, except that the activation email does not arrive! If you think that you have entered it incorrectly, contact the Administrator, who will reset it.
Note that the system will ask you to choose another Username or Email address if your entry is the same as an existing registered user (even if it is yours!).
Password: Choose something that you will remember: The system Administrator can retrieve your username and email address, but your password is encrypted by the system, so even the Administrator can not see it.
You must enter your password in the Confirm password box also.
Next, you must enter a Confirmation code which has been displayed in a distorted graphic. Ensure that you enter it using the correct letters (usually uppercase) and numbers. The example above shows: LH18DU.
The purpose of this is to prevent automated registrations from ‘Spam-bots’ and other web robots, as they are unable to read the code from a graphic and will be unable to complete the registration process.
The disadvantage is that the code is sometimes difficult to read and easy to confuse letters with numbers.
If you enter the code incorrectly, the registration will fail when you Submit the form and you will be prompted to enter the code again. Note that the code is changed every time you attempt to re-register.
The rest of the form is optional and you may skip straight down to the Submit button.
Note that the registration settings become your Profile Settings once you are registered and may be edited after you have logged in (see 1.7 Profile Settings).
These are indicated with an asterisk “*”;
Username: It is preferred that you use your real name, as this tells other users who they are talking to.
E-
If you enter your address incorrectly, you will not receive any indication, except that the activation email does not arrive! If you think that you have entered it incorrectly, contact the Administrator, who will reset it.
Note that the system will ask you to choose another Username or Email address if your entry is the same as an existing registered user (even if it is yours!).
Password: Choose something that you will remember: The system Administrator can retrieve your username and email address, but your password is encrypted by the system, so even the Administrator can not see it.
You must enter your password in the Confirm password box also.
Next, you must enter a Confirmation code which has been displayed in a distorted graphic. Ensure that you enter it using the correct letters (usually uppercase) and numbers. The example above shows: LH18DU.
The purpose of this is to prevent automated registrations from ‘Spam-
The disadvantage is that the code is sometimes difficult to read and easy to confuse letters with numbers.
If you enter the code incorrectly, the registration will fail when you Submit the form and you will be prompted to enter the code again. Note that the code is changed every time you attempt to re-
The rest of the form is optional and you may skip straight down to the Submit button.
Note that the registration settings become your Profile Settings once you are registered and may be edited after you have logged in (see 1.7 Profile Settings).

4.0.3: COPPA (Children's Online Privacy Protection Act)
This is an American standard, which doesn’t require implementing in the UK. However, when you click on the term agreement link “I Agree to these terms and am under 13 years of age” and complete the Registration Information Form, you will be sent an email which must be signed by a Parent or Guardian:
4.0.4: COPPA Form
After a successful registration for a member under the age of 13, you will be sent this form via email.
Print the form and sign it. Then either post it to the COPPA Address, or fax it to the COPPA Fax (please telephone on the number first). If you have a scanner, you could also scan it and send it via email to the Administrator on oadmin@dsvc.co.uk . If you have accepted the terms, your account will be activated.
4.0: Registering on the Organ Alley Forum
If you are a new user and wish to start using the forum, then you must register.
If you look at the top of the main page, you will see a menu bar:
If you are a new user and wish to start using the forum, then you must register.
If you look at the top of the main page, you will see a menu bar:
4.0.1: Registration Information Form
Once you have clicked on the term agreement link, you will be taken to the Registration Information form:
Once you have clicked on the term agreement link, you will be taken to the Registration Information form:
Please read through them, then click on one of the three links below the terms.
If you agree with the terms, click on either of the top two links. If you are under 13 years old, your registration will have to be approved by a Parent or Guardian (see 4.0.3 COPPA).
If you agree with the terms, click on either of the top two links. If you are under 13 years old, your registration will have to be approved by a Parent or Guardian (see 4.0.3 COPPA).

Welcome to Organ Alley Forums
In compliance with the COPPA act your account is currently inactive.
Please print this message out and have your parent or guardian sign and date it. Then fax it to: COPPA Fax
OR mail it to: COPPA Address
-
Permission to Participate at Organ Alley
Username:
Password: Your_Password
Email: Your Email Address
~~~~~~~
~~~~~~~
HAVE REVIEWED THE INFORMATION PROVIDED BY MY CHILD AND HEREBY GRANT PERMISSION TO Organ Alley TO STORE THIS INFORMATION.
I UNDERSTAND THIS INFORMATION CAN BE CHANGED AT ANY TIME BY ENTERING A PASSWORD.
I UNDERSTAND THAT I MAY REQUEST FOR THIS INFORMATION TO BE REMOVED FROM Organ Alley AT ANY TIME.
Parent or Guardian
(print your name here): _____________________
(sign here): __________________
Date: _______________
-
Once the administrator has received the above form via fax or regular mail your account will be activated.
Please do not forget your password as it has been encrypted in our database and we cannot retrieve it for you. However, should you forget your password you can request a new one which will be activated in the same way as this account.
Thank you for registering.
-
Thanks, The Organ Alley Team

5.0: Uploading Pictures
When you are posting, you can insert a picture into your message.
In the Posting Form (see 3.0.4 Using the Posting Form), you will see the Upload Picture button..
When you are posting, you can insert a picture into your message.
In the Posting Form (see 3.0.4 Using the Posting Form), you will see the Upload Picture button..

5.0.1: Picture Upload Control Panel
When you click on the Upload Picture button, the picture upload control panel will open in a separate window:
When you click on the Upload Picture button, the picture upload control panel will open in a separate window:
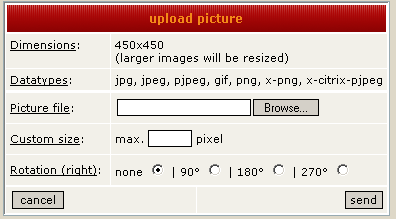
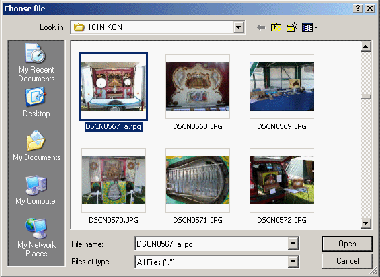
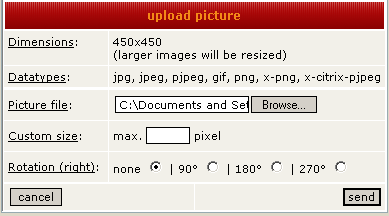

First you must locate the picture on your computer by clicking on Browse. This opens a file browser.
Locate the image you wish to upload and double click on it, or select it and click on Open.
Locate the image you wish to upload and double click on it, or select it and click on Open.

The selected filename will appear in the Picture File box. Click on Send:
Your picture upload should now start. The transfer will be faster if you are using Broadband.
After the picture is uploaded, a preview will be shown.
You may have to resize the window to see all the links below the image:
After the picture is uploaded, a preview will be shown.
You may have to resize the window to see all the links below the image:
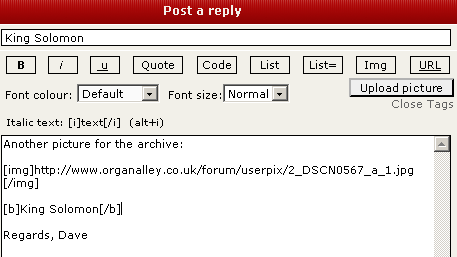
Click on the Insert Picture Standard link This closes the uploader window and modifies the message:

You will see the ‘picture’ has been inserted into your message at the cursor position in between [IMG] tags.
Ensure that the IMG tags do not become detached from the ‘http://www...’ Address, otherwise you will be left with a link to the picture, but no picture showing in your post.
When you have finished, click on Preview to check the message, or Submit to post it on the Forum.
Ensure that the IMG tags do not become detached from the ‘http://www...’ Address, otherwise you will be left with a link to the picture, but no picture showing in your post.
When you have finished, click on Preview to check the message, or Submit to post it on the Forum.
Ensure that you close the uploader window before attempting another picture, because you can only have one uploader open at a time. If you do not close it, you will be clicking on the ‘Upload Picture’ button in the Posting Form for evermore, with no results!
5.0.2: Picture Uploading Issues
Picture files are uploaded to a folder in the Organ Alley web site: www.dsvc.co.uk/forum/userpix.
When a picture is uploaded, the original picture is first saved in the userpix folder, then it is then automatically resized and saved at its new dimensions. It is also renamed to ensure that each filename is unique.
At present, all pictures will be restricted to 625 pixels wide by 625 pixels high. A smaller picture will not require resizing.
The reason for resizing is:
1. To limit the amount of space used on the web server.
2. To ensure that upload and download times are as short as possible.
3. To prevent the frames of the forum window from 'breaking'!
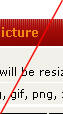
There is an upper limit to the size of picture file that can be uploaded.
This is approximately 1024*768 at 200Kbytes. This figure is not ‘set in stone’, but it should be used as a guide when uploading pictures.
If you attempt to perform an upload with a larger picture, the Picture Uploader software will not complete the resizing process, because the web server will ‘time-out’, due to the process taking too long and you will be left with a blank Upload Picture window.
If this happens, don’t forget to close the window before attempting to send another picture, because you can only have one uploader open at a time. If you do not close it, you will be clicking on the Upload Picture button in the Posting Form for evermore, with no results!
There are various photo editing software packages, which usually have a picture size facility included.
Windows provides a basic picture editor called ‘Paint’, which will allow you to stretch/reduce an image.
5.0.2: Picture Uploading Issues
Picture files are uploaded to a folder in the Organ Alley web site: www.dsvc.co.uk/forum/userpix.
When a picture is uploaded, the original picture is first saved in the userpix folder, then it is then automatically resized and saved at its new dimensions. It is also renamed to ensure that each filename is unique.
At present, all pictures will be restricted to 625 pixels wide by 625 pixels high. A smaller picture will not require resizing.
The reason for resizing is:
1. To limit the amount of space used on the web server.
2. To ensure that upload and download times are as short as possible.
3. To prevent the frames of the forum window from 'breaking'!
There is an upper limit to the size of picture file that can be uploaded.
This is approximately 1024*768 at 200Kbytes. This figure is not ‘set in stone’, but it should be used as a guide when uploading pictures.
If you attempt to perform an upload with a larger picture, the Picture Uploader software will not complete the resizing process, because the web server will ‘time-
If this happens, don’t forget to close the window before attempting to send another picture, because you can only have one uploader open at a time. If you do not close it, you will be clicking on the Upload Picture button in the Posting Form for evermore, with no results!
There are various photo editing software packages, which usually have a picture size facility included.
Windows provides a basic picture editor called ‘Paint’, which will allow you to stretch/reduce an image.
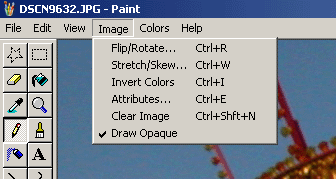
5.0.3: Reducing a picture using Windows Paint
Open the ‘Paint’ program, this is usually located in the ‘Accessories’ folder using the following path (on XP):
Start Button>All Programs>Accessories>Paint
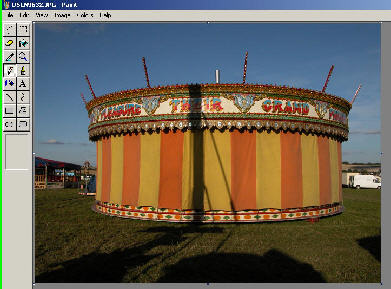
Load an image and select the Image menu. Select Stretch/Skew...
Open the ‘Paint’ program, this is usually located in the ‘Accessories’ folder using the following path (on XP):
Start Button>All Programs>Accessories>Paint
Load an image and select the Image menu. Select Stretch/Skew...

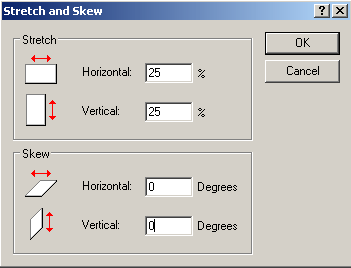
This will display the Stretch and Skew control panel.
Enter the required Horizontal and Vertical size as a percentage. You will have to choose your values based on the original picture size. See 5.0.4 Standard Digital Picture Sizes.
Ensure that you enter the same value, otherwise the picture will not retain its width/height proportions.
Note that 50% in both is four times smaller; half the width and half the height. Click on OK.
Your resized picture will be shown. You can now save it, but ensure that you use a new filename to prevent overwriting the original image.
If you are ready to send your registration, click on Submit. If you wish to start again, click Reset.
If you have any difficulties using the Registration form, please contact the Administrator, who can enter your details for you. Remember that you can change your password once you have registered, if you wish.
4.0.2: Activating your account
After you have submitted your Registration Information, you will be emailed an acceptance form.
To activate your account, click on the link provided:

Welcome to Organ Alley Forums
Please keep this email for your records. Your account information is as follows:
-
Username:
Password: Your Password
-
Your account is currently inactive. You cannot use it until you visit the following link:
Web address link to your profile in the Organ Alley Forum
Please do not forget your password as it has been encrypted in our database and we cannot retrieve it for you. However, should you forget your password you can request a new one which will be activated in the same way as this account.
Thank you for registering.
-
Thanks, The Organ Alley Team
Your reduced picture file should now upload successfully.
5.0.4: Standard Digital Picture Sizes
These are some of the standard sizes generated by digital cameras and the percentage required to resize each of them to 640 x 480 (remember that a smaller image will upload and download faster):
2560 x 1920: Resize to 25%
1600 x 1200: Resize to 40%
1280 x 960: Resize to 50%
1024 x 768: This should upload without resizing
640 x 480: This will upload without resizing.