

Section 1: Using ‘php Bulletin Board’ V2
phpBB 2.0 is forum software. It allows people to post ideas, opinions, and information in an organized way. Posts are organized in a way that makes it easy for people to find the information they are interested in, but without having to wade through unrelated information.
Postings in phpBB 2.0 are organized into three subdivisions:
Post - A post is a piece of information submitted by a single user. It may be a new post, which starts a new topic, or a reply to an existing post. Posts are typically a sentence, paragraph, or a few paragraphs.
Topic - A topic is a collection of posts. The posts are organized in chronological order. The idea of a topic is that there is a single post that contains the topic of discussion. The rest of the posts in the topic are replies to this first post and to other replies. Topics are a form of conversation, allowing many people to state their opinions about an idea, or debate an issue.
Forum - A forum is a container for topics. Forums often have a general subject that the topics within are about. For instance, you might have a Movie Reviews forum, which would contain topics in which people would discuss movies and their opinions about them.
Navigating through posts in phpBB 2.0 is based on the idea of posts, topics and forums. Generally, a user will start at the Forum Index . The Forum Index shows a list of forums. If you click on one of the forums, you will be shown the View Forum page, which is a listing of the topics in the forum. By default they are sorted in chronological order by the most recent post in each topic. If you click on a topic, you will be shown the View Topic page, which is a listing of the posts in that topic. The posts in a topic are organized chronologically, with the oldest post first.
1.1: User Accounts
phpBB 2.0 is based on a user system. When a user is logged in, his/her username will be shown with each post he/she makes. Each user may also have some custom settings which allow them to control the look and feel of the board as they use it.
1.1.1: Registration
In order to log into the board as a user, you must register a username. To do this, click the small Register link at the top of any page.
You will be taken to the Registration Agreement Terms, which you must agree to in order to register.
You will then be taken to the registration information form. Fill out each of the required fields, and any of the optional fields you like. The settings on the registration form are identical to those in the Profile Settings form, for more details see 1.7 Profile Settings.
When you register, you must specify an email address. All email from the board to you will be sent to that address. You must check your email and click the activation link there before you may log in.
1.1.2: Logging In
In order to post using your username and use your custom settings on the board, you must log in. To log in, you must use the small login form at the bottom of the Forum Index page.

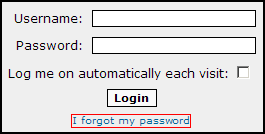
Alternatively you may click the small Login link at the top of any page to be taken to the Login Page.
Enter your user name and password, and click Login. You will be taken to the page you were previously using, but will now be able to post with your username, change your profile, check private messages, etc. To log out of the board, click the small Logout [<your username> ] link at the top of any page.
If you are not logged in and attempt to do anything that requires a login, you will be taken to the login screen. After you log in, you will be taken to the page you were attempting to go to before logging in. Things that require login include changing your profile, checking your private messages, posting to forums (if they require it), etc.
If you forget your password, go to the Login Page. Click I forgot my password.
You will be taken to a form to enter your username and email address. A new password will be created, and sent in an email to you. When you receive the email, you need to click the new password activation link. The new password activation link exists so that if someone else enters your information into the Forgotten Password form, your current password will remain intact. After you have activated your new password, you may log in with it. You may change your password to what you like in your profile. For more information, see 1.7 Profile Settings.
1.2: Posting
There are two primary ways to create a post. In the View Forum and View Topic pages, you may click New Topic. This will take you to the posting form, and, when you have posted, will create a new topic with your post as the first one in the topic. In the View Topic page, you may also click Reply. This will take you to the posting form, and, when you have posted, it will add your post to the topic you replied to. To reply to a specific post, you may also click the Quote button in the upper right corner of that post. For more information, see 1.2.7 Quoting
1.2.1: Posting Form
When you post a new topic or post a reply, you are taken to the posting form, where to enter your post.
Subject - The subject of your post. If this is a new post, the subject is required, and it will be the name of the topic. If the post is replying to another post, the subject is not required, but may be added, and will be shown at the top of the post.
Message Body - The Message body is a large text area where the body of your post is input. Plain text is the only thing allowed in this text area, but special formatting, links, smilies (emoticons), images, etc. may be added through the use of Smilies, BBCode and/or HTML (if they are enabled).
Smilies - Smilies (also called emoticons) can be added to posts. You may only use smilies in your post if they are enabled on the board you are using. To see if smilies are enabled, look in the lower left corner of the posting form, you should see "Smilies are ON/OFF". If smilies are enabled and you would like to disable them in your post, check the box next to Disable Smilies in this Post. For more information, see 1.2.6 Smilies
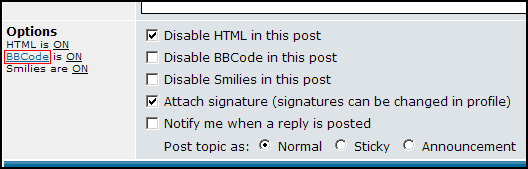
BBCode - BBCode allows you to add special formatting to your posts. You may only use BBCode in your post if it is enabled on the board you are using. To see if BBCode is enabled, look in the lower left corner of the posting form, you should see "BBCode is ON/OFF". If BBCode is enabled and you would like to disable it in your post, check the box next to Disable BBCode in this Post. For more information, see 1.2.5 BBCode.
HTML - You may use HTML to format your posts. The HTML tags allowed may be configured by the Administrator. You may only use HTML in your post if it is enabled on the board you are using. To see if HTML is enabled, look in the lower left corner of the posting form, you should see "HTML is ON/OFF". If HTML is enabled and you would like to disable it in your post, check the box next to Disable HTML in this Post.
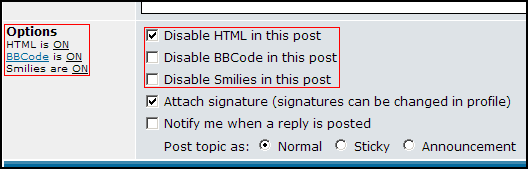
Signature - You may add a signature to your post. To do this, check the box next to Attach Signature. You may change your signature by editing your profile. For more information, see 1.7 Profile Settings.
Reply Notification - When you post, you may be interested in knowing when that topic is replied to. If so, you may check Notify me when a reply is posted. For more information, see 1.6 Watching Topics.
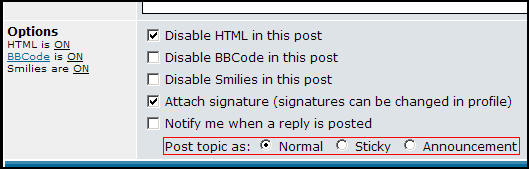
Sticky/Announcement - To make a post into an Announcement or a Sticky Topic, look to the bottom of the posting form. There are radio buttons at the bottom that will allow you to set the post as Normal, Sticky or Announcement. These options will only be visible to a user for the top post in a topic, and only if they have permission to make Announcements and Sticky topics. For more information, see 1.2.2 Announcements below, and 1.2.3 Sticky Topics.
Polls - To add a poll, look to the bottom of the posting form. These options will only be visible to a user if they have permission to make Polls. For more information, see 1 .2.4 Polls.
1.2.2: Announcements
Announcements are a special type of topic. In the View Forum page, Announcements appear above all other topics (at the top of the forum). Announcements will also appear on every View Forum page. For instance, if you had 75 topics in a forum and 50 on each page, announcements would appear on the page with the first 50 topics and on the page with the last 25 topics.
To make a topic into an announcement, simply select the Announcement radio button on the posting form. The top post of a topic must be specified as Announcement for the topic to be an Announcement. For more information, see 1.2.1 Posting Form.
1.2.3: Sticky Topics
Sticky topics are a special type of topic. In the View Forum page, Sticky topics appear above all other topics except for Announcements. Sticky topics only appear on the first View Forum page.
To make a topic sticky, simply select the Sticky radio button on the posting form. For more information, see 1.2.1 Posting Form.
1.2.4: Polls
Polls are a special type of that allow community members to vote on an idea or issue. Polls can only be made from the top post in a topic.
Poll Question - This is the subject of the Poll, the question that is being answered by the poll. The poll question appears at the top of the topic, above the poll options. This is required for the poll.
Poll Option - Poll Options are the possible answers to the poll question. To add poll options, type the option into the text field and click Add Option. To have a valid poll, at least two options must be offered.
Run Poll for - Number of days to run the poll for. After the specified time has passed, the results of the poll are displayed in the topic, and no one else may vote.
1.2.5: BBCode
BBCode is a system that will allow you to format your posts in special ways. The BBCode system uses tags in a way nearly identical to HTML. The primary difference between BBCode and HTML is that BBCode uses square brackets [ and ] instead of angle brackets < and >. For a more detailed description of how BBCode works, click the small BBCode link on the lower left corner of the Posting Form. You may also go to http://www.phpbb.com/phpBB/faq.php?mode=bbcode.
Here is a list of sample BBCode and its output:
[b]Bolded Text[/b]: Bolded Text
[i]Italicized Text[/i]: Italicized Text
[u]Underlined Text[/u]: Underlined Text
[color=red]Red Text[/color] or [color=#FF0000]Red Text[/color]: Red Text
[size=24]Bigger Text[/size]: Bigger Text
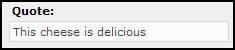
[quote]This cheese is delicious[/quote]:
[quote="The Cheese Man"]This cheese is delicious.[/quote]:
[code]if ($cheese == "tasty") { return true; }[/code]:

[list][*]Cheddar Cheese[*]Limburger Cheese[*]Cottage Cheese[/list]:
|
·
|
Cheddar Cheese
|
|
·
|
Limburger Cheese
|
|
·
|
Cottage Cheese
|
[list=1][*]Cheddar Cheese[*]Limburger Cheese[*]Cottage Cheese[/list]:
1. Cheddar Cheese
2. Limburger Cheese
3. Cottage Cheese
[list=a][*]Cheddar Cheese[*]Limburger Cheese[*]Cottage Cheese[/list]:a
a. Cheddar Cheese
b. Limburger Cheese
c. Cottage Cheese
[email]no.one@domain.adr[/email]: no.one@domain.adr
[img]http://www.phpbb.com/images/phpBB_88a.gif[/img]:
1.2.6: Smilies
Smilies are small images that appear in posts. Usually they are small images of faces, and are often used to show emotion.
To use smilies in your posts, you need to enter a series of characters. Common character series are :) for a happy face , :( for a sad face , etc. Another common style for smilie character sequences is :emotion: (i.e. the emotion the smilie shows, with a colon ":" before and after this). Examples of this are :wink: for a winking face , :lol: for a laughing face , etc.
1.2.7: Quoting Messages
Quoting messages allows you to include other's posts in your own. It is useful for showing that you are replying to a post, or part of a post.
To quote all of someone's post, look at the top right corner of their post and click Quote. This will take you to the posting form, and will allow you to reply to the post. It will also automatically add the appropriate BBCode to your post to quote the post you are replying to.
The proper syntax to quote a post is:
[quote="<name to quote>"]<text to quote>[/quote]
<name to quote> is the source of your quote, and <text to quote> is what you are quoting. So to quote the user Cheese Man saying "Power the behold of cheese."
[quote="Cheese Man"]Power the behold of cheese[/quote]
1.2.8: Editing Posts
Editing posts allows you to go back and fix errors, remove incorrect information, or add new information to your posts. To edit a post, look at the top right corner of your post and click Edit. You will be taken to the posting form to edit your post, and then click Submit to enter it into the database. If you edit a post after it has been replied to, a small message will appear at the bottom of it indicating how many times it has been edited, and when and by whom the last edit occurred.
To delete a post, click Edit and check Delete this Post. Click Submit to finish deleting the post. You may not delete a post if it has been replied to (i.e. it is not the last post in the topic).
1.3: Private Messages
Private messages (PM) allow users on a board to contact each other out of the public eye. Private messages can be described as a cross between email, instant messaging, and phpBB 2.0 forum posting.
To use private messaging, you must be logged in to the board. Look at the top of any page, and click You have X new message(s). This will take you to your private messaging centre.
1.3.1: Sending
There are three primary ways to send a private message. First, you may go your private messaging center and click New Post. Secondly, you may click Post Reply from a private message you are reading. Finally, you may click the PMlink on any user's profile or post.
The posting form is identical to the normal posting form with a few exceptions:
Username - The username of the person you want to receive the message. If you are replying to a PM, or clicked the PM link in someone's profile, this field will be automatically filled for you.
Additionally, PMs may not be Sticky Topics, Announcements, or contain Polls.
1.3.2: Receiving
There are three ways that one may be notified of a new private message. Most obvious is the Private message link at the top of every page. It will display You have X new message(s), where X is the number of new messages you have. You may click this link to take you to your Inbox.
You may be informed of new PMs by an email sent to the email address your username is registered to. You may also be informed of a new PM by means of a small window that pops up while you are viewing the board. Email and pop-up notification will contain a link to your Inbox. Email and pop-up notification may be enabled/disabled in your Profile (for more information, see 1.7 Profile Settings)
Sometimes you may be informed of a new PM, but when you go to your Inbox, there is no new message. This is not a bug, it simply means that the sender must have deleted the PM before you read it. For more information, see 1.3.3 The Outbox below..
You may delete messages by selecting them and clicking Delete Marked. Alternatively, you may delete all messages by clicking Delete All. You may also sort/display messages by age by using the dropdown list box in the upper right corner.
1.3.3: The Outbox
When you send a PM, the message goes to your Outbox. It remains in the Outbox until the recipient visits his/her Inbox, at which point it is moved from your Outbox to their Inbox. While the message remains in your Outbox you may edit or delete your post if you like. The message remains in your control until it is received.
1.3.4: The Savebox
The Savebox is provided as a place to keep important PMs. Often it is used to save valuable messages from the Inbox, and then you can use the Delete All function to discard the rest.
You may save messages in your Inbox by selecting the messages (with the checkboxes next to each message) and clicking Save Marked.
1.4: Usergroups
Usergroups are a powerful feature of phpBB 2.0.0. They allow moderator permissions, private permissions, and any other special user settings to be granted to multiple people. This makes it easy to change settings for a group that has things in common without having to edit each user's individual permissions. It is also possible to make the Group Moderator (controls group membership) someone who is not an administrator, granting power to users without leaving your board's administration panel vulnerable.
1.4.1: Joining a group
There are two ways to join a group. First, you may be added to the group by the group moderator. This is not controlled by the user, but by the group moderator through the group control panel. This is the only way to become a member of a Closed or Hidden group.
To join an open group, click the small Usergroups link at the top of any page.
Choose the group to join from the Join a Group dropdown list shown, and click View Information. This will take you to the Group Control Panel. Click Join Group to request membership in the group. The Group Moderator will receive an email informing them of the request, which they must approve before you become a member of the group. For more information, see Moderating a Group next.
1.4.2: Moderating a Group
For each group, there is one Group Moderator. The group moderator may control membership to the group by adding and removing members. They may also control the Group Type. The group moderator is specified in the admin panel. For more information, contact the Administrator.
1.4.2.1: Adding Members
To add members to a group, go to the Group Control Panel. In the lower right corner, there is a text field. Enter the username to add, and click Add Member. Additionally, you may use Find a username if you are not sure of the name of the user to add.
1.4.2.2: Approving Members
To approve a user's membership to a group, go to the Group Control Panel. Look at the bottom of the page at the Pending Members section. Check the box next to the member(s) to approve and click Approve Selected. You may similarly select and deny a user's membership to the group.
When a user requests to join a group, email will be sent to the group moderator with a link to the Group Control Panel. This allows the group moderator to be notified, speeding the approval process.
1.4.2.3: Removing Members
To remove members from a group, go to the Group Control Panel. Check the boxes next to the names of members to remove, and click Remove Selected.
1.4.2.4: Group Types (Open, Hidden, Closed)
Group types may be changed by the group moderator or a board administrator in the Group Control Panel. They may also be changed by board administrators in the Group Management section of the admin panel. For more information, contact the Administrator.
Open - All users may see the group and group members. Users may request membership to this group. For more information, see 1 .4.1 Joining a Group.
Closed - All users may see the group and group members. Users may not request membership to the group, but may be added by the group moderator.
Hidden - The group and its members are not visible to normal users. Users may be added by the group moderator. If a hidden group is moderator of a forum, the group will show up in the
1.5: Searching
phpBB 2.0 has a search system that will allow you to find topics you are interested in. To get to the search page, click the small Search link at the top of any page.
1.5.1: Search Query
Search for Keywords - You may search for words in the content of topics. Enter the words to search for into the text field.
If you select Search for any terms or use query as entered, then topic containing ANY of the words you entered will be displayed. You may use the AND, OR, and NOT operators to indicate which words you want to search for. Use AND to indicate that multiple words MUST be found. Use OR to indicate that a word is optional/alternate. Use NOT to indicate that a word should not be present in the topics displayed.
If you select Search for all terms, only topics containing all of the words in the query will be displayed. Selecting this option has effects comparable to using Search for any terms or use query as entered, with the AND operator between each term.
You may use the asterisk(*) wildcard character to broaden your search. The asterisk will match any number of characters. So *cheese* will match cheese, cheesewheel, wheelcheese, or wheelcheesewheel. Likewise cheese*fudge will match cheesefudge, cheeseyfudge, or cheese597fudge.
To increase the speed and decrease the overhead of the search utility, only words may be searched for. Phrases (such as "cheese wheel") may not be searched for, except by their component words. The minimum size for words is four characters, and the maximum size is twenty characters. Any non-alphanumeric character (e.g. white space and punctuation) is a word boundary.
Search for Author - You may search for posts by post author. Simply enter the author's username into this text field. You may use the asterisk(*) wildcard in author's names to broaden your search. Again, the asterisk will match any number of characters.
1.5.2: Search Options
Forum - Select the forum you wish to search in, or All available. To search multiple forums, search by Category.
Category - Select the category you wish to search in, or All available.
Display Results as Posts - Search results will be displayed as a list of the posts. Part of the post that matches the query will be displayed, and the search terms highlighted. For each post there is a ling
Display Results as Topics - Search results will be displayed as a list of Topic titles. For each topic there is a link to the forum it is in, the topic itself, and the author of the topic.
Search Previous - This dropdown box will allow you to specify the maximum age of posts to display as results of the search. There are also radio buttons here that will allow you to search only the body of posts, or the subject(title) of the posts as well.
Sort by - This will allow you to specify how search results are organized. You may sort by Post Time, Post Subject, Topic Title, Author, or Forum. The sort may be in ascending or descending order alphabetically (or chronologically where appropriate)
Return first - When Display Results as is set to Posts, this dropdown box will allow you to control how much of the post is displayed in the search result.
1.6: Watching Topics
You may subscribe to topics in phpBB 2.0.0. When a topic you are subscribed to is replied to, an email will be sent to the email address that your username is registered to. The email will contain a link to the topic that has been replied to. You will only receive one email per topic until the next time you log in to the board.
1.6.1: Subscribing to Topics
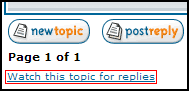
To subscribe to a topic, look at the lower left corner of the Topic View page. Click the small Watch this topic for replies link.
Additionally, if you post or reply to a topic, you may check Notify me when a reply is posted to subscribe to a topic.
1.6.2: Unsubscribing from Topics
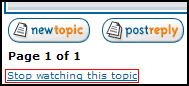
To unsubscribe from a topic, look at the lower left corner of the Topic View page. Click the small Stop watching this topic link.
Alternatively, you may look at your notification email. At the end of the email (right above the signature) there is a link that will unsubscribe you from the topic.
1.7: Profile Settings
To edit your profile, click the small Profile link at the top of any page.
You must be logged in to edit your profile. To make changes to your profile, change the values on the form and click Submit at the bottom of the page.
Username - Your username on the board, the name you use to log in. You may change this name if the board Administrator allows it.
Email - The email address your account is registered to. All emails from the board to you will go to this email address. You may change the email address if you like. If you change your email address and the board is using User activation, then you will need to activate your changed email address. You will be sent an email (to the new address) with an activation link if this is the case.
Password - The password you use to log in. If you change your email address or password, you must enter your current password. If you are changing your password you will need to enter the new password twice to verify it.
Fields in the Profile Information are self-explanatory.
Always show my Email Address - If Yes a link to email you will appear in your profile. If set to No, the link will not appear.
Hide your online status - If Yes you will not be visible to normal users in the Who is Online? list at the bottom of the Forum Index.
Always notify me of replies - If Yes then the Notify me when a reply is posted checkbox on the posting form will be checked by default. You may still uncheck it each time you post.
Notify on new Private Messages - If Yes an email will be sent to your registered email address each time you receive a private message.
Pop up window on new Private Messages - If Yes you will see a pop up window notifying you of new Private Messages you receive while browsing the forums.
Always attach my signature - If Yes then the Attach signature checkbox on the posting form will be checked by default. You may still uncheck it each time you post.
Always allow BBCode - If Yes then the Disable BBCode in this post checkbox on the posting form will be unchecked by default. You may still check it each time you post.
Always allow HTML - If Yes then the Disable HTML in this post checkbox on the posting form will be unchecked by default. You may still check it each time you post.
Always enable Smilies - If Yes then the Disable Smilies in this post checkbox on the posting form will be unchecked by default. You may still check it each time you post.
Board Language - Selects the language of board messages/text. Any text from other users or administrators is unaffected.
Board Style - This has been preset by the Administrator, so it is not selectable by the user.
1.7.1: Date Format
phpBB 2.0.0 allows you to specify the date format that you see on the board. This is done by allowing you to specify the format using the PHP syntax. For full details on how this works, see http://www.php.net/date.
The date string is a series of letters and punctuation. Each letter will be replaced with a part of the current date and time, and the punctuation is used to organize this information in a way that makes sense to you.
The default string for this field is "D M d, Y g:i a" This will display your date in the form Sat Apr 09, 2002 4:09 am. All of the punctuation and spacing remains intact, and each letter is replaced with part of the date/time.
D is the first three letters of the day of the week. M is the first three letters of the month name. d is the numerical date, with leading zeroes. Y is the year, four-digit format. g is the hour, 12-hour format without leading zeroes. i is the minutes, with leading zeroes. a is am/pm, in lowercase letters.
1.7.2: Time Zones
To have the board time show correctly, please select your time zone. The time in phpBB 2.0.0 does not work with Daylight Savings Time, so if you have Daylight Savings Time, add 1 to your GMT modifier. So if you are in GMT-5 and have DST, you will need to set your time zone to GMT-4.
1.7.3: Avatars
An ‘Avatar’ is defined as ‘A physical incarnation of a spirit’. On a Forum, Avatars are small pictures that are displayed with each post as a ‘physical’ representation of the user. Each user may choose his/her own avatar. However, permission to allow users to have avatars is controlled by the board administrator. Each of the following settings may be enabled/disabled by the Administrator.
Gallery Avatars - You may choose your avatar from a gallery of avatars. The gallery is a collection of avatars stored on the server that the board is running on. To select an avatar from the gallery, click Show Gallery. You may use the dropdown list at the top of the gallery to navigate between categories of avatars. To choose an avatar, check the radio button underneath it and click Select Avatar.
Remotely Linked Avatars - You may use an image that is hosted on another site as your avatar. To do this, just enter the URI into the text field. It is recommended that the images are small and do not deform tables or distract people. Administrators have the ability to block specific users from having an avatar.
Uploaded Avatars - If you have an image that you would like to use, you may upload the image to the server that the board is on. You may upload an image on your computer by clicking the Browse button. You may also upload an image by entering the URL that the image is located at. Uploaded images have an admin-controlled limit on file size and image size.
Section 2: Moderating
Moderation allows content on your board to be controlled. A moderator of a forum may edit, delete, split, or move topics in that forum. A moderator may also edit or delete any post in a topic in that forum. A board administrator automatically has moderator permissions to every forum on that board. Moderator permissions for a specific forum may also be granted to a user or group of users. For more information, contact the Administrator.
2.1: Moderator Control Panel
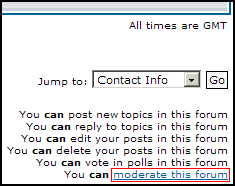
To get to the Moderator Control Panel, click the small moderate this forum link. This link appears in the lower right corner of Forum View and Topic View pages that you have moderator permissions in.
2.1.1: Moving Topics
In the Moderator Control Panel, you may move any number of topics from the current forum to another forum. To do this, check the boxes next to each topic and click Move. Select the forum that you would like to move the topics moved to. Select if you would like to leave Shadow Topics, and click Yes to complete the move.
2.1.1.1: Shadow Topics
Shadow Topics may be left when a topic is moved from one forum to another. Shadow topics exist so that when someone commonly checks a topic, they will not be confused when it gets moved. A shadow topic appears in the original forum, and links to the topic in its new forum. The text "Moved: " will appear in front of the shadow topic in the old forum. A shadow topic will not be marked unread when new replies are posted to the topic, so it should eventually move down the forum as new topics are made and replied to. The actual topic (in the new forum) will be updated as replies are posted.
Suppose there was a topic titled "What kinds of cheese do you like?" in a forum named General Discussion. Suppose that a moderator moved that topic to the Cheese Discussion forum, and left a shadow topic. In the Cheese Discussion forum, there will be the topic named "What kinds of cheese do you like?" This topic will be marked unread as replies are posted to it. In the General Discussion forum there will be a topic named "Moved: What kinds of cheese do you like?" This topic will link directly to the topic in the Cheese Discussion forum, and will not be marked unread as replies are posted.
2.1.2: Deleting Topics
In the Moderator Control Panel, you may delete any number of topics. To do this, check the boxes next to each topic and click Delete. You must confirm your decision by clicking Yes.
2.1.3: Locking and unlocking topics
In the Moderator Control Panel, you may lock or unlock any number of topics. To do this, check the boxes next to each topic and click Lock or Unlock. A locked topic may only be posted to by moderators and administrators.
2.1.4: Splitting Topics
In the Moderator Control Panel, you may split a topic by clicking on the topic title. You will be taken to the Split Topic Control Panel. You may select the posts to split; they will then be removed from the topic and put into a new topic. This will allow you to move off-topic posts to another topic, keeping your topics more organized.
New Topic Title - The title of the new topic created by the split.
Forum for new topic - The forum that the new topic will be located in.
To split only specific posts from a topic, check the box next to each post and click Split selected posts.
To split a post and every post after that one, select the first post to split and click Split from selected posts.
2.2: Moderator Quick Actions
Moderator Quick Actions are small buttons at the bottom of each topic.

They allow moderation tasks to be performed quickly for the specified topic.
2.2.1: Moving Topics
To move a topic, click the Move Topic button.
Select the forum to move the topic to, select whether a shadow topic will be left, and click Yes to complete the move. For more information, see 2.1.1 Moving Topics above.
2.2.2: Deleting Topics
To delete a topic, click the Delete Topic button.
You must confirm the delete by clicking Yes.
2.2.3: Locking and Unlocking Topics
To lock or unlock a topic, click the Lock Topic button or Unlock Topic button.
-
The appropriate button will be displayed based on whether the topic is currently locked or unlocked. A locked topic may only be posted to by moderators and administrators.
2.2.4: Splitting Topics
To split a topic, click the Split Topic button.
You will be taken to the Split Topic Control Panel. For more information, see 2.1.4 Splitting Topics.


Overview